Stopwatch, Counter & Morse Code Encoder
Embedded systems are a big passion of mine, and exploring different microcontrollers is a fun experience. In this episode, I have created three main projects using the intriguing PIC16F833.
-.-. .... . -.-. -.- / .. - / --- ..- -
Background: Here are three main projects from my Embedded Systems class using the PIC16F833. They all took more than 10 hours per week each to make them work, but I learned a lot!
Counter
Specifications:
Only use the PIC as the microcontroller.
Count from 0 to 99.
Overflows and underflows at 99 and 00 respectively.
Code from scratch.
Interrupt-based routine.
Use time division multiplexing for controlling displays.
Make the code easily modifiable for different wirings of 7-segment displays.
Results:
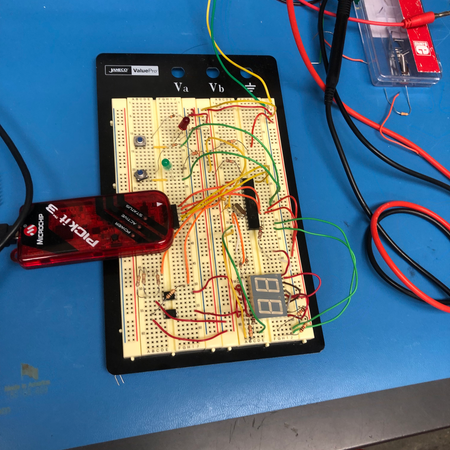
This was the circuit that we had:

Our code was structured as follows:
And a video of it working:
Stopwatch
Specifications:
Counts from 0.0 seconds to up to 99 seconds.
For the first 10 seconds, show 0.1 s increments.
From the tenth second and beyond, show 1 s increments.
Make it as accurate as possible when compared with a normal stopwatch.
One pushbutton should be able to start/pause.
A second pushbutton should be able to reset the timer.
Use interrupts for the buttons.
Use time divison multiplexing for controlling displays.
Results:
We used the same circuit as above:

Our software architecture for this one was as follows:
And this is a video of it working:
Morse Code Decoder
Specifications:
Decode the duration of input waves as dashes or dots.
Form symbols by detecting input waves using the diagram below between each pause.
Minimum detectable length of an input is 100 μs.
A dot is a high input with duration of 30 ms - 200 ms.
A dash is a high input with duration 200 ms - 400 ms.
A space is a low input with duration 30 ms - 400 ms.
A pause is a low input with duration greater than 400 ms.
The tolerance for the duration limits are of 50 μs.
Not use __delay_ms calls in the code.
Waiting state should have the display off.
A symbol should be displayed for 2 seconds.
If a character is not in the character set, show a dot in the display.
Results:
This is our circuit (deja vu):

This is our software architecture for this project:
And... this is a video of it working:
In the video, you can see it show "CE459" which is the part of ECE459 that I was able to capture in the video.
Unfortunately, I did not have a video documentation for another project in this class that involved writing BLE communication over a IEEE 802.15.4 protocol to communicate two nodes composed of mbeds and two Microchip MRF24J40MA radio. Our goal was to pass a message between these two nodes and get it back clearly. I learned many details about BLE and it was great to have more exposure to wireless communication.
Takeaway: I love embedded systems, so these projects were very fun to work with! I learned a lot from the challenges each one had, and I really appreciate the opportunity to learn about new microcontrollers. I spent a lot of time troubleshooting these circuits and the code, but I learned to enjoy more and more troubleshooting the puzzles that comes with complex systems.
Project Gallery


